Halloween Candy Jar

personalized gift tags candy jar

I love to give away treats on any and all holidays and creative packaging makes them extra special. When I am short on time, I always turn to mason jars - they are easy to decorate, reusable, and who doesn't like to get a jar full of goodness?  I used Joy iron-on letters for this project - they are quick and easy to add to any project!

The amazing METAL RIBBON I picked up at Hobby Lobby - I am pretty enamored of this stuff at the moment! I also used  a piece of Deco Mesh left over from another project, some grosgrain ribbon and some twine.

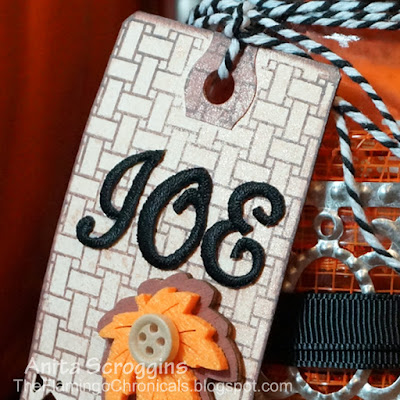
personalized gift tag
For the tag I stamped the background with an a Background Basics stamp by Ann Butler for ClearSnap. These stamps are so flexible - I have used them on so many projects! Once I had the tag ready, I added my Joy Iron On Letters with craft glue rather than ironing them on since I was working on paper.  The fall leaf embellishment is also from Hobby Lobby. 

Thanks so much for stopping by today!

Little Witches Cooking School


Hi everyone - I am so ready for Halloween!  I think this might be the last piece of decor I make this year. Maybe.  I received some amazing happy mail from Little B LLC filled with lots of Halloween themed goodies. I wanted a little something for the front table and I had these amazing vintage jars I picked up a while back in the thrift store I was itching to use.
http://www.littlebllc.com/
There is a fabulous prize up for grabs - so be sure to check out the bottom of my post. There are lots of photos- just sayin'


I applied washi tape to each jar and used the Decorative Label punch on some vintage Bo Bunny paper which I hand lettered. I added a few cute stickers to some of the labels. Twine around the bottle necks finished them off.

I used the Halloween Dies to add accents to craft sticks and added them to each jar. Did you notice the jar is green?? I love these little jars? I don't know what they were originally but I had to have them!

I created this cute sign to go along with my bottles. I used an 8 1/2 X 11 acrylic craft frame from Deflecto Crafts. The labels around the edge are from this years Tim Holtz Halloween paper pad; I simply trimmed the pieces from a sheet and adhered them all around the edge.  I used the Celtic Knot punch for the decorative strip near the bottom and I added a couple of flowers from the Petal Strips line to my huge bow on the upper corner.  As a side note - I used my Cameo Silhouette to print the insert :)


I applied more washi tape to kraft paper and punched with the Decorative Label punch. I added these randomly around the edge of the frame and added some stickers here and there.

How cute are these Sugar Skulls???

OK - these spider stickers are pretty creepy y'all! They are FURRY!!!!


Ok, I said there was a great prize up for grabs and here it is,,,,,,,,,,,,
Who wouldn't want to win this?? Here's the deal - you must "like" the Little B Facebook  page and comment on the blog posts. It's 2 points for each comment, so the more comments the better your chance to win!  You can find all the participating blogs at the Designer Crafts Connection Blog  so be sure to hop on over and check out the fun.


a Rafflecopter giveaway


Third Annual Thrift Benefit Linky Party


I am super happy to be participating in the Third Annual Thrift Benefit Linky Party for Sheltered Animals. This is such a great cause and very near and dear to my heart! Almost all the animals I have ever been blessed with have been adopted from a shelter or simply showed up on my door step. So many animals are in need of love - and did you know that in addition to donating to your local animal shelter you can also SHOP to help them out?? That's right, so many shelters these days operate thrift stores to help fund their rescue efforts. To find a Thrift Store for Sheltered Animals in your area check out this link.

A While ago I picked up these great little drawer units at the Second Chance Treasures Thrift Store in Garland. 

These are eight separate drawers and they were $1.41 each - the deal of the century! I grabbed them up as soon as I saw them and stopped on the way home to buy some spray paint! Of course, I did not remember to take any photos of the actual process of spray painting them - please use your imagination!

I am guessing these were used in an office at one point.


They will now be holding this fabulous array of goodness that DecoArt was so kind to send me. If you have not checked out DecoArt's new Media Line of paints and mediums please run and do that right now because they are awesome!

And after painting they look like this! A wonderful new addition to my craft studio.


The drawers are the perfect size to hold the various pieces of the media and I can reach them easily from my work table.  I used Sign Tags from Deflecto Craft to label the drawers - the tags come with a chalk marker so you can erase/edit when you need to. I attached with removable glue dots so I can easily change the labels out. 

Thanks so much for stopping by! I can't wait to see what my friends came up with for their thrifted projects! 


This is a sponsored post. As a member of the Deflecto Design Team I have been provided product in exchange for my creative ideas, views, and opinions.


Botanical Mini Album

I taught this fun little mini album recently at The Crafty Scrapper in Waxahachie. I fell in love with the Kaisercraft papers as soon as they came into the store although they are not my normal go to colors.

As a general rule I RUN from purple - seriously. But these papers were so beautiful I just couldn't resist them!!  I used a mix of the 12x12 papers and the 6.5 x 6.5 paper pad and of course I added in lots of extra stuff to fill out my album. For the front cover I used a chipboard left over from another album, a Tim Holtz die to cut some Little B Chipboard which I embossed with my Eileen Hull folder from Sizzix. Lace is from Maya Road and flowers are from Petaloo. And of course, all my inks are VersaMagic DewDrops from Tsukineko - because I love them so much!!

On the left page I used a coin envelope to hide a tag for journaling. On the right side I used a stamp from Wendy Vecchi and the cute little clay pot die is from Eileen Hull.

One of my favorite ways to add an extra page in is to line a a few tags and use washi tape to hold them together. By the time you add papers to the front and back it is very sturdy!

We all know I love to add pockets, flaps, and lots of interactive pieces to my albums. I added a fabulous punched flap to the Graphic 45 Lg tag. Adding Glossy Accents to the punched portion really adds strength to it.

How awesome are these colors against the black here!

The page on the right is a 5 x 7 kraft envelope - perfect for tucking memories into the top.

I used another Wendy Vecchi stamp for the tag on the left. The back of the album is a from Heart Of Texas Studios.  I used my Cinch Binding tool from We R Memory Keepers to pull it all together and added lots of ribbon.

There is ONE kit left for the album. If you are interested in it- please contact the store directly at 972 923 3151.

Thanks for stopping by today and have a wonderful week!