Steampunk Wall Decor with Smoothfoam

Howdy to everyone in blogland! Today I have some fun wall decor to share with you.

I saw something link this at a local retail store, but it was priced at more money than I am willing to spend for something I can make myself!  So I pulled out some Smoothfoam and went to work.

I wanted something small, so I started with a 12x12 SCrapbook page Mount and cut it down to three 5.5" squares using a craft knife. To see a tutorial on this by Julie McGuffee check it out here.


I traced my cut shape onto the back of 6.5 x 6.5 cardstock, snipped the corners and adhered to each block. 

For this block I heat embossed Creative Embellishments chipboard pieces with Sparkle N Sprinkle EP. I adhered them over a small piece of MD Hobby gold metal.

For this block I used Whipped Spackle and a Tim Holtz stencil on the background, added another chipboard piece from Creative Embellishments, and some die cuts from the Kaisercraft paper pad I used to cover the blocks.

For the last block I ran a piece of MD Hobby & Craft Metal Sheet Roll (Gold) through my Cuttlebug with an embossing folder.  I inked the metal piece with StazOn and added another chipboard piece. 

Products used:
Kaisercraft papers; Be-YOU-tiful & Storyteller
Creative Embellishments chipboard pieces
Sparkle N Sprinkle Embossing Powders
Eileen Hull Embossing Folder
MD Hobby & Craft; Metal Sheet Roll & Hobby Shears
Tsukineko Inks: StazOn Black, VersaMagic Midnight Black, VersaMark
Adhesive 
heat gun 
craft knife


Thanks so much for stopping by today! I hope you are having a wonderful week so far :)


Wedding Favor Bags with Decorative Trimmings

Today I am so happy to share with you a project made using Decorative Trimmings. I was given the opportunity to work with these fabulous trims and ribbons- and we all know how much I love trims and ribbons!

I had the best time shopping their site and picking out the trims to work with. I have made several projects so far, with more to come. I. LOVE. RIBBON. Really.

For this month's challenge we are all working with a wedding theme. I love to make wedding favors- really any kind of party favor- so that is what I went to work on.

I have had this flocked hot box for some time now, I picked it up in a vintage shop a few years ago. Had to have. It is FLOCKED Y'all. To start, I took the lid, and adhered it to the bottom of the box, to make a base.

I dyed some 1/2" White Rayon Ric Rac silver and adhered around the base.

Next up I adhered White 1 1/2" Eyelet Embroidery lace around the top edge using double sided tape and added some flowers to the front that had been sprayed with silver mist.

For the favors, I used small kraft bags, folded the top over and added a silver metallic doily. I folded 1/2" Turquoise Rayon Ric Rac and more of the 1/2" White Rayon Ric Rac into bows, securing with my Tiny Attacher. To finish them off I glued small white flowers in the center of each one.

To see all the projects in the hop, be sure to check out the Designer Crafts Connection Blog- this group has got some talent!

Thanks so much for stopping by today!

Bunny Ear Baby Teethers using Fusi-Boo

Howdy everyone in blog land. Spring has sprung and I am super happy about that! Of course, in Texas that means bluebonnet photos and here is my Princess in her first set of photos

Seriously - how cute is that face! "Mimi- what do you mean I can't eat it?"

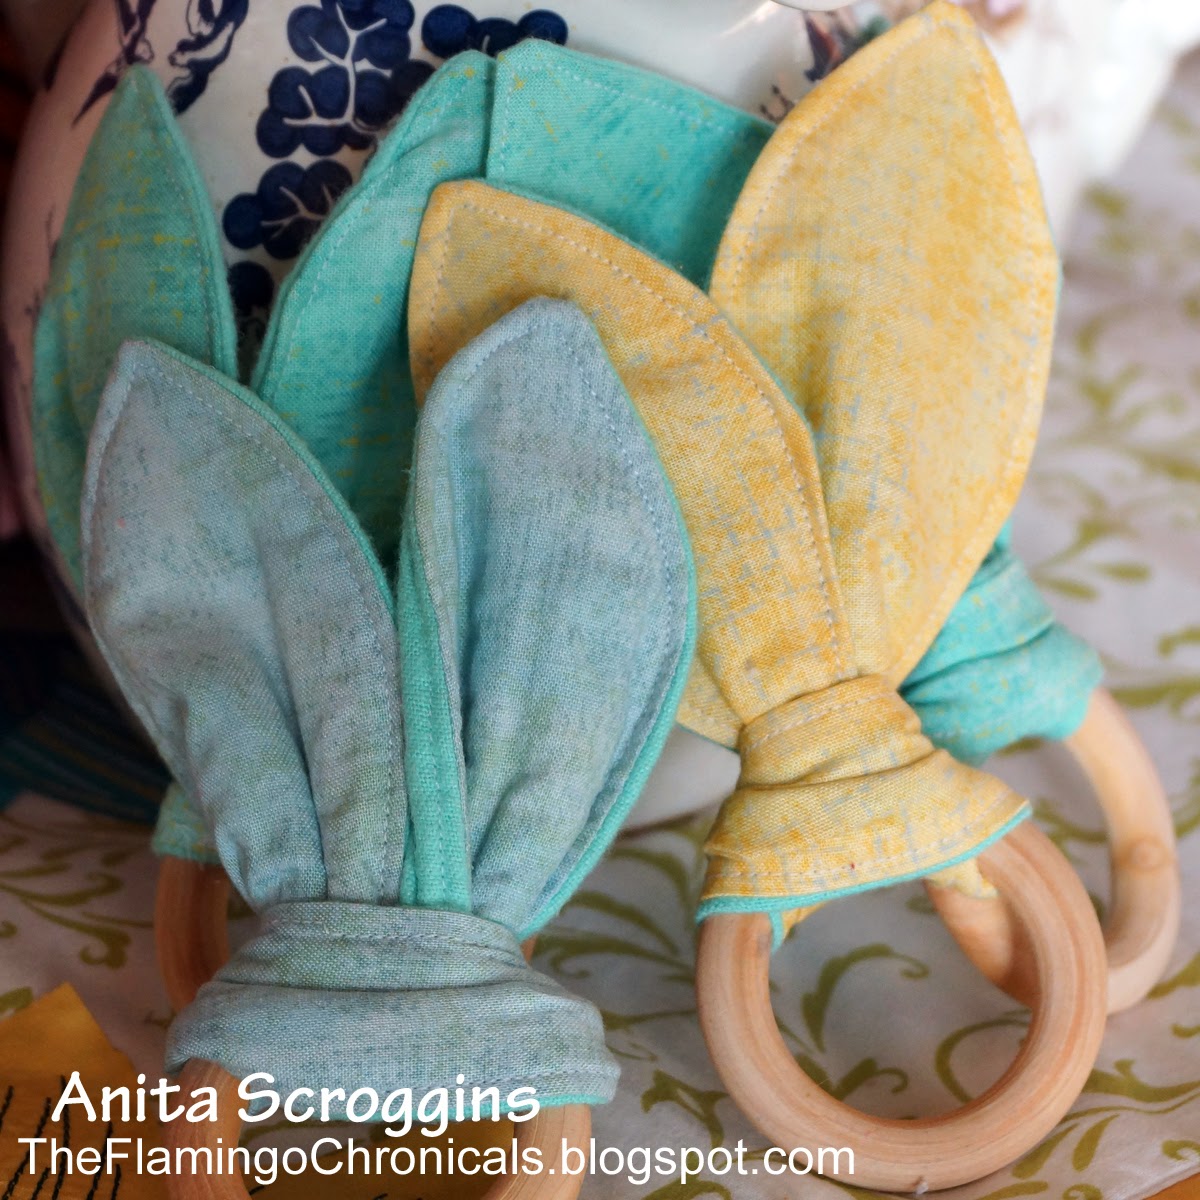
Of course, the Princess is putting everything in her mouth these days since she is teething, so I needed something for her to chew on.  I got out some beautiful fabric from ADORNit and my Fusi-Boo from Fairfield World and went to work. Here is what I came up with (thank you Pinterest!)

These were so easy and quick- if you can sew a straight stitch you can make these.


I love these fabrics! I have used Burnish Mustard, Burnish Aqua, Burnish Grey, Burnish Green, Burnish Pink, and Red Burnish. You can find them all here.

First thing is to cut your fabric and Fusi-Boo into strips about 4" wide X 14" long. You will need:
  • cotton print fabric for the front
  • a flannel or minky fabric for the back
  • Fusi-Boo for the middle
I made 10 of these in just over an hour. By working on each step 10 times, before going on to the next step, it really speeds up the process!

I drew a pattern on 8 1/2 X 14 paper and cut it out. Be sure to add your 1/4" seam allowance to the pattern. Place your fabrics right sides together, and add a layer of Fusi-Boo, then pin the pattern on and cut out.

Stitch around the fabric, leaving one side of the middle portion open. Snip the ends to cut down on bulk and turn inside out. Press the seams flat, making sure to turn the open section under 1/4". 

Top stitch all the way around the fabric very close to the edge and press again. I used a Lark's Head Knot to tie them on my wooden rings (ordered from Amazon). She loves these things! The best part is, when they are soaked in drool you can take the fabric off, throw it in the washer, and put it back on the ring. Super handy.

Be sure to check out ADORNit for beautiful fabrics and Fairfield World for Fusi-Boo.

What have you been working on lately, please share a link with me in the comments! I would love to see.

Thanks so much for stopping by today! Have an amazing weekend!

Precious Memories Baby Album with Deflecto

Howdy everyone! Today I want to share a new product from Deflecto Craft Solutions with you. 

In my box this month I received a package of 5x7 Flexible Pouches and I knew right away that I was going to use my Cinch and make a mini album with them.

 Thank you Marilyn for the photo- I totally forgot to take one before I started creating!


I used some new Graphic 45 papers for this project along with a few items from my stash. I made the covers using book board that I cut to size.

 I love the weight of these, they are super sturdy for my photos, but I was still able to punch 3 at a time for my album.


I used Blue Fern Studios and Dusty Attic chipboard, Melissa Frances rhinestone pin, Offray ribbon roses, Petaloo flowers, and May Arts ribbon to embellish the front of the cover.

I created some bead charms for the spine of my album using beads and findings Connie Crystal. I love the touch of bling this adds and it looks like I spent so much time, when it was so quick!


Thanks so much for stopping by today! What have you crafted lately?


Fun Tote Bag with Tulip Fabric Markers

I love to get surprise boxes in the mail. I really love to get boxes with brand spankin' new art products I have never used before. There is nothing like taking those pens out for the first time and writing with every single color to see what they look like!

A couple of weeks ago the amazingly creative and generous Laura Kelly Walters sent out some mystery boxes filled with fun stuff. My FAVORITE was the Tulip Fabric Markers.  Fabric + Markers makes one happy crafter!

 Picture of Fine Tip Multi 12 Pack
 
These things are pretty cool y'all. I couldn't decide what to create, I had so many ideas running through my mind. As I was looking at the fun stuff Laura sent, inspiration struck. She had also included a very cute little fabric bag - that she sewed herself no less- and I decided that would be a little tote bag for the Princess.  


First I added a narrow hem to the top of the bag. I cut the butterflies using some lightweight cotton, iron on interfacing, and my Cameo. It was super easy to iron the butterflies on the bag, then the fun began! I outlined each butterfly using the Tulip Fabric Markers and added lots of doodles to the bag. The fine tips on the markers were perfect for adding these small details to my bag!

Laura also sent some super cute buttons- and we all know I LOVE buttons! I added a few of those to the front of the bag as well. To finish it off I added some ric-rac around the top edge and at the bottom as well, both from Decorative Trimmings.

Hop over to Laura's website to check out all her craftiness and be sure to pick up some of these Tulip Fabric Markers for yourself. And don't forget to enter for the prize below.


a Rafflecopter giveaway


Spring Banner- Home Decor

Hi everyone, I am guest blogging over on Craft Paper Scissors, be sure to stop by and check out all the amazing projects!  I love Spring! It is my favorite time of year. Everything is coming alive in the yard, the birds are singing, the flowers are blooming and the world is happy. I like for my decor in the house to reflect those same feelings so cheery and full of color is the name of the game.

This year a created a new banner using laser cut wood pieces, cardstock, colorful flowers, and lots and lots of fun ribbon!


I found these wood cutouts at a popular chain craft store last month and I knew that I had to make a banner with them- they just yelled SPRING at me from the shelf. I started by covering the wood with two layers of VersaMagic ink in Pink Petunia, glueing them to cardstock when dry.


I pulled out my trusty decorative edge scissors and trimmed around the edges of the shapes- no measuring, I just eyeballed it. Then the real fun began! I pulled lots of spring colored flowers from my stash (have you seen my Prima Breeding Program?) and started layering them together. For the section on the right above, I punched three pieces of patterned cardstock in staggered sizes, shaped them, layered them together using foam tape, then added that onto a larger daisy. Easy peasy- super fun flower!


For the flower on the left I used vintage crepe paper and an XXL Glue Dot to create the back section, then adhered a ruffled flower in the center to complete the look. I have several tutorials on making your own flowers here.

For the section on the left I made a ruffled flower using Italian Crepe Paper, using a Maya Road trinket as the center, then adhered it into a hoarded vintage Martha Stewart paper flower (shown in the previous photo on the right). For the right section, I layered 7-8 hoarded vintage Prima flowers, using my Tiny Attacher to secure them in the center. These are the nice, big ones they used to make that came in the cans that are about 4" across. I really miss those!

 Something I do every time I make a banner is group lots of ribbons between each section. I just love the way this looks. I picked up this technique years and years ago in a class, so long ago I don't even remember what the class was about or for! The process is simple- grab a bunch of different ribbons, clip them to about 4" and lay them on your work surface. Take one ribbon and clip it a little longer- about 6" and use this one to tie all the others into a bunch, using a sturdy knot. Then tie that onto whatever string you have going from section to section. Easy peasy.

Thanks so much for stopping by today!

Handmade Flowers - First Monday Hop with Designer Crafts Connection

Howdy everyone! It is the first Monday of the month and this month our theme at Designer Crafts Connection is Handmade Flowers.
In order see all the cool graphics, check out the logo in my side bar ------->
Use the arrows on the bottom to navigate through the ring. 


I love making flower embellishments for my projects.  There are so many ways to create beautiful flowers from things you already have in your stash! This is a class I will be teaching in May at The Crafty Scrapper in Waxahachie.  We will be learning how to make 10 different flowers.

This flower is one of my favorites. It is made using Italian Crepe Paper and the XXL Glue Dots®.


This one is made from vintage crepe paper I found a few years ago. The glittered edge is Bo Bunny Glitter Paste.

I love being able to customize the flower to my project, adding different things for the centers, and using paints and mists to color them.

A vintage box flower that I learned a long time ago in a quilting class.

This one is made using plain cardstock and paper punches. I used stickles to add the sparkle to the edges.


I have several how to's on flower making in my Tutorials page - be sure to check them out. Thanks for stopping by today and have a wonderful week!


Easter Treat Boxes Tutorial

Hi everyone, I am Guest Blogging over at Craft Paper Scissors today and I have a fun and easy project to share with you. I love to feed people and host parties- and I am so happy those things go hand in hand! I was fortunate to help out a friend with a small Easter themed tea party. I wanted the guests to be able to take lots of goodies home with them after the party. Of course, I had to create some instead of buying some, and here is what I came up with.


I wanted to keep with the soft colors I was using for my table, pinks, yellows and pale greens. Since I was using vintage dishes and linens I wanted to keep the lines fairly clean as well, which is pretty hard for me! My PP are from ADORNit -  I am loving these papers, I have been using them on everything!


I used my Silhouette Cameo to cut out my boxes and layers, then inked all my edges. If you do not have an electronic die cut machine, they are lots of patterns online for creating your own.


I adhered all the layers before assembling the boxes. I used Eileen Hull dies (from my Prime VIB Blogger Event Box) and Maya Road stamps for the label on the from, using foam tape to give it some dimension. Each box is a little different; I simply added a few embellishments from my stash keeping with the color theme. I used a small piece of strong, double sided tape on each flap to assemble them.


For the handles, I simply cut 12" x 3/4" strips of cardstock, applied double sided tape to all but the last inch on each end, then applied coordinating ribbon to each strip. The ribbon gives the cardstock more shape and makes it more durable.


To add the handles I used more double sided tape at the very ends, and added the handles to the inside of the boxes.

I finished each one off with a sparkly bow made from Offray Metallic ribbon. 

Thanks so much for stopping by today! Be sure to hop over to Craft Paper Scissors and check out what's going on over there.

Have a fabulous Holiday this weekend!