Embellished Christmas Stocking

 Who doesn't love a beautiful embellished Christmas stocking? I also love all the parties that Christmas brings. Last week I went to a Girls Night Out and we had a Stocking Exchange. Being the crafty person that I am, I grabbed some Rinea Foil and a trusty Sizzix die and went to work!
   
 
 I love Eileen Hull's flower dies - and they are perfect for cutting Rinea foil with. You can cut several layers at a time which makes the work go quicker. I used both the smooth foil and the embossed foil for this project.
 
 I ended up using multiple dies, stacking several layers of petals together and using a tiny attacher to hold them together. I used my Surebonder hot glue gun to attach the Maya Road resin flower to the middle.
 
 
 Shaping the foil is a breeze - just pinch the petals, or roll them around a pencil. They stay just where you put them! 

Be sure to check out Rinea Foil - they have some amazing products  and you are going to love them! Their inspiration team is wonderful too - so many great ideas for you to see. 

Thanks so much for stopping by today! Merry Christmas to you and yours.


Etched Christmas Ornament Workshop

Etched Glass Christmas Ornaments

I was so happy to teach my Etched Christmas Ornament Workshop at the second annual Christmas Carousel at The Crafty Scrapper a couple of weeks ago. This event is so much fun! Participants get to go home with FIVE completed projects at the end of the day.  I love to show off how easy glass etching is using etchall® Etching Creme

 Participants had the option of coloring their etched design with ink (shown above) or adding detail with a white pen. (I recommend Signo)

Everyone had a great time learning new skills. We used flat disc ornaments from Hobby Lobby for the base and stencils I cut using etchmask® on my Cameo

 We finished off the ornaments with a bow and some simple embellishments. They are perfect for hanging on the tree or giving as a gift!

 Are you looking for a craft good time to have with your friends? Etched Christmas ornaments are wonderful to create while you catch up with your friends. 


This post contains affiliate links. When you purchase products through these links I may receive a small commission, however your price is not affected.

Noel Card Holder

 Christmas Card Holder
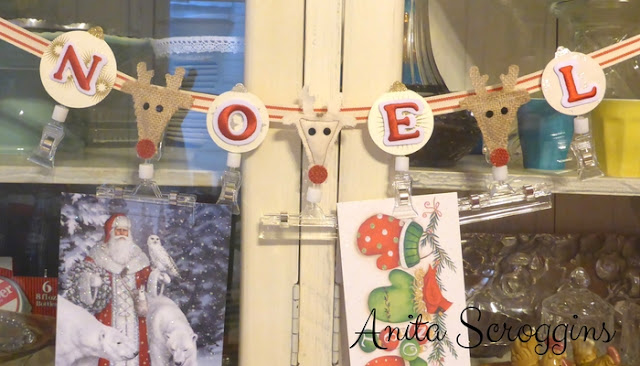
I love to display my Christmas cards each year. They are such a fun way to add to your decor. This Noel Card Holder is so cute (look at those reindeer!) and super easy. You can make one for you and a friend too.

Supplies:


I pulled some cute die cut shapes from my Christmas box and adhered my letters one to each die cut.


I used Tombow Xtreme Tabs  to adhere the embellishments to the top half of the VersaGrip Clips.  These little tabs are CLEAR and they hold so well it is amazing.


For this project I used the Wide Clip Sign Holders and the Double Clip Sign Holders.  Clip the embellished clip to a ribbon leaving the bottom clip empty for your amazing Christmas cards!  ( How cute are these little canvas Reindeer?? )


Resin Butterfly Ornament

Do it yourself Resin Butterfly Ornament
A while back I ordered these beautiful wood butterflies from an online site and have been waiting on a chance to use them. When I had an opportunity to use Amazing Casting Products - including their Amazing Casting Resin - I knew what I had been waiting for!

I started by hot gluing my decorations in the bottom of a Maya Road large bottle cap embellishment. When that was done it was time to mix my resin.


The resin kit comes with everything you need and full instructions. You will mix equal amounts from the two bottles together for the total amount of resin that you need. Then stir together until it is clear.

I like to mark my lines on the sides of the cups so I don't over pour. The lines are marked on there for you, but I just like big, well defined lines!


http://www.moldputty.com/
Amazing Casting Products has a great line up of products - so see them all check out their blog HERE.  

The Designer Crafts Connection team had a wonderful time exploring all the fun things that can be made with Amazing Casting Products - to see them all hop over the to blog HERE

 While you are over on the Designer Crafts Connection Blog be sure to check out the great prize that is up for grabs. One lucky winner will receive the prize pictured above. All the details are on the Designer Crafts Connections Blog.


Spooky Halloween Mini Album - Halloween Popcorn Box Party

Halloween Popcorn Box Party
It's Halloween so it's time for a few new tricks and treats and the Halloween Popcorn Box Party is serving up both! There are 75 wonderful designers who received product from the fabulous sponsors to play with and I came up with a fun Halloween Mini Album. 

The sponsors for this party are amazing - Adornit, World Market, Kunin Group, Udderly Smooth, Tombow USA, Expressionary, Ellison/Sizzix, Expo International, Oriental Trading. Be sure to check them all out!

This mini album will get a lot of handling by a toddler, so it needs to be durable and stand up to a lot of wear. The Deflecto Sign Tags are perfect for making pages in a mini album! They can be punched with all the binding machines on the market, decorated anyway you like, and they hold up to an amazing amount of wear. I made a template for my page size and cut the sign tags using a craft knife and a metal ruler.


The Sign Tags can also be cut with the large steel rule type dies. I wanted this amazing frame on the cover, but since it sticks out there is no way it would survive made from paper. The Sign Tags are not only durable, they are flexible as well. Pretty much toddler proof.

See that little spider on the front - Oriental Trading. Cuteness overload. The pumpkin is Kunin felt, the fence is matboard, both are die cut with vintage Sizzix dies.

 I love these little Trick and Treat trinkets. Guess where they came from?? Oriental Trading! Yep. They are a few years old, but I think we all know that I am a hoarder.

Who doesn't like pompom trim??? I think we should drape the whole world in pompom trim - it would make everything better! My papers are from Doodlebug Designs the are vintage designs.


The inner pages were decorated with patterned paper and a variety of embellishments.The pumpkin is a Laura Kelly die cut from Sizzix. The little black cat - did you know that you can cut Kunin Felt with thin dies?? Yep, you can. (die from LittleB).


Be sure to check out the post with all the projects shown. There are some fabulous things to check out.  You can find it here

Of course there is a prize up for grabs! Enter here for your chance to win.

a Rafflecopter giveaway


Quilted Wall Art using Fabric Elements

Fabric Elements Quilted Wall Art


Hi everyone, I am super happy to be participating in this months challenge at Designer Crafts Connection - we are working with kits provided by Fabric Elements.

These darling kits are the creation of Rebekah Meier and here is what she has to say about them:
For those not familiar with Fabric Elements, here is a little background.  Award winning Fabric Elements™ is a culmination of my experiments, favorite materials, and techniques.  It is a collection of my stencils, tissue paper, and fabric designs with pre-packaged fiber goods – such as batting, felt, gauze, Lutradur, and many others.  The collection is designed to work together with my techniques and instructions to create endless mixed media and fiber art projects.  I love to take the ordinary – like quilt batting and interfacing – and combine them with paint, inks, and other embellishments to elevate them into something extraordinary!

I created something a little different with mine kit, here's a look.

Mixed Media Fabric Art
Instead of making one large quilted project I chose to make 4 smaller ones for a collection of wall hangings. I will have a full tutorial on this coming up later in the week with step out photos, so be sure to check back.

Quilted Mixed Media Hot Air Balloons
Each one of these little quilted pieces is 4 x 5.5 and I used random stitching on them. I also used double the amount of batting that the kit called for to give them extra dimension.

DecoArt Metallic Lustre Paints
I used a huge variety of Blue Fern Studios chipboard on this project and each piece was painted with DecoArt Metallic Lustre Cream Paints. Those things are the bomb if you have never tried them!

Blue Fern Studios Chipboard
It is super easy to blend the Metallic Lustre paints because they are so creamy.

Random sewing patterns
I used several colors of paint paint from the DecoArt Media line for the background, then stenciled on some texture using the Crackle Paste.

Chipboard with Metallic Lustre Paint
A white paint pen rounded out the project, adding accents here and there.

Of course we have a great prize up for grabs, so don't forget to head over to the Designer Crafts Connection blog and check out all the details.


Thanks so much for stopping by today and have a fabulous week!

TX Pinners Conference - coming soon!

Mixed Media Chistmas Tags Pinners Conference Tx
Pinners Conference TX is coming soon! Are you going? We will be at the Arlington Convention Center September 9-10, 2016 and there are loads of great classes. I will be presenting a super fun Mixed Media Christmas Tag class. We are going to have some messy fun. I have some fabulous items to give away too - you don't want to miss all the fun!


Still need to pick up your ticket- you can save 10% by using the code ANITA at checkout. 

If you are like me, you love Pinterest- so come on out and check out some of the best ideas from the web come to life. There will be fabulous shopping too - who doesn't love that?  Check out some of these sponsors!

What are you waiting for?? Grab your friends and grab your tickets now! The fun is almost here!!


Table Top Easel Photo Display

Table Top Easel

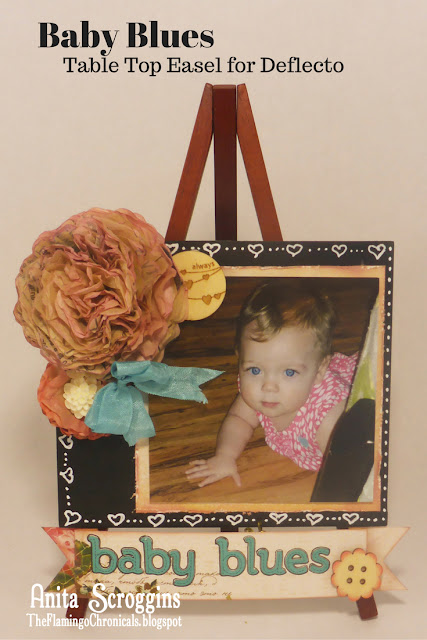
Today I have a fun project to share using Deflecto Wet-Erase Sign Easel.  These handy little things come in a three pack and you can use the chalk markers shown here to make quick changes for everyday use.

http://deflectotocraftwith.blogspot.com/


Decorated table top easel

For today's project however, I wanted something a little more permanent so I started by using a paint pen to draw the uber cute border you see here all the way around the chalkboard. I matted a photo of The Princess and added that using foam tape for some added dimension.

Flowers made with Eileen Hull dies and Vintage Sewing Patterns
To make the flowers I used some of the new dies I FINALLY tracked down from Eileen Hull for Sizzix. I used vintage sewing patterns and added a resin center to the smaller one.

Folded Paper Banner

 The title for this piece was probably the easiest thing I have ever come up with! This child has the bluest eyes - they are amazing. To make the banner I cut and folded a piece of patterned paper and adhered to the bottom of the easel. Some alpha stickers and a Maya Road wood embellishment finish it off.

Be sure to check out all the fun stuff Deflecto has to offer, you can find us all over the web!


This is a sponsored post. Deflecto has provided product in exchange for my creative ideas, views, and opinions.