Dream SNS Winter Wonderland Reveal

Welcome to Sparkle N Sprinkle's November 1 Release.


This month we are bringing you two marvelous new stamp sets by artist Rosiland Solomon with FIVE chances to win

the first two chances are with our "Winter Wonderland" Release Contest

 and

three more chances with the SNS monthly challenge where the monthly theme is always "Anything Goes with Glitter, Embossing Powder and/or Flocking."


The Winter Wonderland stamp set and the Flourishes Two stamp set are both available on line.

The beautiful Winter Wonderland stamp set is included in Jazzy Jill's Technique Video for the month.

Here is a look at the project I made with the Flourishes Two stamp set
I will have more details and closeups on my project in a few days.

Want to win a prize???


To win, just come to our Mystery Designer Party!

How the Mystery Party works:


On two of the participating blogs below, a Commenter will be selected to receive the prize
No one knows who the Mystery Designers are, so you may wish to visit each blog to leave a comment.

The Winter Wonderland stamp set, one glitter and one EP will be awarded to one commenter.

The Flourishes Two stamp set, one glitter and one EP will be awarded to another commenter.

The winners will be announced on November 3 on Facebook, the SNS blog, and on our blogs:


Both sets are available available at 20% off 
as part of our Wintry specials. 
Just use the code WINTRY20 in the COMMENTS SECTION 
when checking out in the SNS on-line store 
to receive these brand new sets at 20% off.
Promotion valid through November 3.(sorry, credit card customers only. Total will be manually adjusted. Or phone the SNS shoppe on Wednesday and ask them to manually adjust the charge on the phone for you).


I also have some BLOG CANDY up for grabs! 

 I will ship it anywhere, so be sure to enter!

How do you win?
1. Leave  a comment on this post for 1 entry
2. Like my Facebook Page for 1 entry
3. Share about my blog candy on your blog or FB page for 1 entry
-and-
you must be a follower of my blog in order to win! 

Thanks for stopping by my blog today.

May The Flamingos Be With You!
Anita

Painted Background Tutorial - Frosted Designs

Hi everyone, today I have a a project and a tutorial
to share with you using the fabulous

Have you bought one of these for yourself yet??
What are you waiting on? They are awesome!

Here is a look at my layout
Everything here is from the kit, except for the cardstock. 
I like to add fun texture to my background papers and a great
way to do that without adding a lot of bulk to your page is to use paint.

I mixed the cream and blue paint in the kit on my craft mat.
Now, this can get a little messy. I cut a piece of the mesh, and stuck it in the paint.
Then I used the same craft stick I mixed the paint with to rub the mesh into the paint and
make sure that it was loaded. I am not too worried about getting all of it covered.

 I use my tweezers to move the mesh to my paper, then I place 
a piece of scrap paper on top of the mesh and press down. The scrap paper will 
allow you to get a good transfer without
1. getting it all over your hands
2. smearing the paint all over the paper
Pick up the scrap paper, then pick up the mesh and repeat. 
USE A NEW PIECE OF SCRAP PAPER FOR EACH IMPRESSION.
or you will get paint from previous transfers. 

Here is what my background ended up looking like
Set aside to dry for just a few minutes and you are ready to go!

I inked some of the buttons from the kit, tied floss through them and
used them as a banner. All the other paper elements were fussy cut from
the papers.
I absolutely adore this ribbon that was in the kit! 

Thanks so much for stopping by today and I hope that you
give this technique a try. It is messy, but fun!

Anita

Girl Scout Camping with Sparkle N Sprinkle

Hi everyone in blogland! I hope you had a wonderful weekend!

Today I want to share a layout I made using lots of wonderful Sparkle N Sprinkle products.
My papers, die cut stickers, and journal tags are all from the Little Yellow Bicycle 
Fern & Forrest Collection. The Cork and Burlap accents are also LYB. 

I added Seaspray Glitter to my burlap heart using Sparkle and Sprinkle Dimensional Glue

I added Tear-iffic Tape to my chipboard before I die cut it, then it is super easy to add your embossing powders to it. I used Chunky White and Tuscan Sun here.

I applied Tear-ific-Tape to a piece of paper slightly larger than my quote, peeled the backing paper off, centered my quote on the tape leaving a small strip of exposed tape on the top and the bottom. I rubbed Priceless Peacock Glitter into the exposed tape - easy way to add sparkle!

I stamped the quote from Tulips #491 onto my journal card, and heat embossed using Cappuccino Embossing Powder.

I used a multitude of Embossing Powders on my chipboard piece.

Here is another look at the chippie, you can see all the colors blended together. For the small flowers I covered them in Brushable Glue then Diamond Dust Glitter.

 Be sure to check out the Sparkle N Sprinkle Blog  to see all the details for this layout &the supplies used along with lots of great projects from the Design Team.

Thanks for stopping by today!
Anita


Discover Canvas with Faber-Castell®

Hi everyone, it's Anita today and I want to share with you a canvas
I made using lots of wonderful Faber-Castell® products.

I used a flat canvas for this so I could do some stamping on it. For the image at the top
I used my Stampers Big Brush Pens; Black to stamp the image and it is colored
 with Light Cobalt Turquoise #154.
To create the colored dots that are scattered across the canvas I used my
soldering iron to melt Paper Crafter Crayons in a variety of colors.

I started by painting the background with Gesso mixed with Bubble Gum Gelatos®.
I wanted a streaky effect so I did not mix the Gelatos® all the way in. 
While the Gesso was still wet I pushed small doilies into it for texture.

To color my background I mixed several colors of Gelatos® with water and 
brushed the colors on randomly.  I like to mix my colors right on my craft mat - it is easier 
for me to work with it this way.

I colored wood butterflies with Blue Metal and Metallic Grape Gelatos. I applied the colors
directly to the wood and blended with my fingers.


I added accents with Black and White Stampers Big Brush Pens then sprayed
them with a fixative for some shine.

For my title I colored a chippie with Cherry Red Gelatos® and then added 
a coat of Diamond Glaze. For the background I used more Gelatos® mixed with 
water to stamp the circles.

I used my Black Stampers Big Brush Pen to stamp my images then
added some glitter glue for sparkle.

Here you can see one of the doilys after it has been colored.
I added a sprinkle of tiny chipboard stars to finish it off. 

Thanks for stopping by today and I hope you enjoyed my project. 
Anita

 supplies used:

Stampers Big Brush Pen Black
Gelatos®:
Lemon
Banana
Buttercream
Butterscotch
Teal Metal
Blue Metal
Bubble Gum
Red Cherry
Paper Crafter Crayons:

Other:
Art Canvas
Paper Doilies
ribbon
flowers
Wood Butterflies: Recollections
Stamps: Technique Tuesday
Chipboard word: Want2Scrap
Chipboard stars: Um WOW Studios
Glitter Glue: Stickles
Adhesive: Beacon, other


Selfie - Frosted Designs Mixed Media Kit Reveal

Hi blogging buddies!  
Over on the Frosted Designs blog this week we are showing
off the new Mixed Media Kit. We are also introducing all of our team
and it is my turn to share a little bit about me, I
thought I would share it here too!

1. Well,, I am a paper addict- we all know this.
2. I love to garden, 
 3. I am a clean freak - I vacuum my ceilings. 
4. I am a sucker for a stray cat!
5. I am an avid baker and made custom wedding cakes for 15 years
and oh
6. I have a Masters Degree in Aeronautical Engineering. :o)
Yes, I am the proverbial Rocket Scientist.

So, enough about me and onwards to the fabulous
I was so happy to be able to play with it!!

How yummy is this kit??? You really will want one for yourself!

Here is the first project I made with mine.
Yes, my DD1 is the queen of selfies, she took them before
anyone even knew what they were!!

I used the stencil and the cream paint from the kit to make
my background.

I added some doodles around the photo edge with my White Pen. The
chipboard that the title is on is a Technique Tuesday boarder that I cut to size.

I love all these elements and how they all came together.
For a little color on my wooden button, I added a little bit of ink and
tied the black floss that was in the kit into a bow.

Thanks so much for stopping by today!
Be sure to order a kit for yourself- you will love it!
Anita

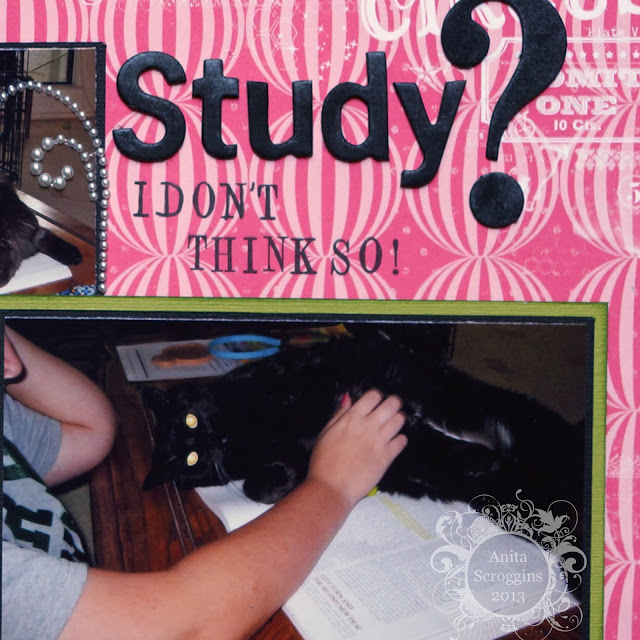
Study???? ColourQ #211

This post was scheduled for Tuesday, but blogger is not my friend some days :o( 

Hi everyone in blog land, I hope you are having a great week so far!
I have the winner of my blog candy to announce and 
a layout with the new ColourQ palette to share with you today.

Here is a look at the palette we are working with this week

And here is my layout
I have used MME papers and Bazzill cardstocks along with some Basic Grey die-cut
stickers, MS doilys, Prima flowers, some bling, a stencil and modeling paste.
I used a craft stencil and modeling paste to create the large leaf, then painted through the stencil with Silks paint from Creative Imaginations. 
I used Kaisercraft chipboard for my title and colored it with Tsukineko ink.
My DD2 was trying to study and Paco Kitty decided that he wanted a pet
and he was not taking no for an answer! 

Be sure to stop by the blog to link up your project before next Tuesday.
There is also lots of great inspiration for the talented ladies in the 
Royal Court so you will want to see what they have to show you!


Now for the fun part!
Who wants to know the winner of my fabulous blog candy??
I used Random.org to select a winner and here is what we have

Miriam Prantner you are the winner! 

Wonderful page! I love the defined center line and great use of embellishments!

Please contact me using the email button here on my blog with your 
address and I will get your prize out to you.

Thanks so much for stopping by my blog today everyone
and have a fabulous week!!

Anita

Frosted Designs Online Store Grand Opening

We are super excited to announce the Grand Opening of

Frosted Designs Online Store and Kit Club

There are two monthly kits available,
a Scrapbook Kit and a Mixed Media Kit,
as well as a variety of fabulous products
that you are going to want to have. 

If you arrived from The Frosted Designs Blog you are
on the right track. If not you might want to start
from the beginning here

I have a fun prize to give away,
so be sure to read all the way to the bottom!

Here is my layout to share today,,,

I have used MME papers, Bazzill cardstock, and lots of 
goodies from the Frosted Designs Store. 


I used a stencil and modeling paste to start my background. 
I mixed Faber-Castell Gelatos into my paste to color it. 
The metal piece to the right is part of the Mixed Media
Kit that is available from the store. 


My chippies are from Um Wow Studios, as is the flair


How cute is this little crocheted flower??
It is part of the Mixed Media Kit.

The chipboard piece here is from Um Wow Studios too. 
Love them!!


We thought it would be fun to share our favorite
items from the store. Here are my picks


I love the dylusions White Linen spray -
it is actually WHITE!


Faber-Castell® Gelatos® are one of my favorite
mediums to color with. Love them!


And I love chipboard! All kinds of 
chipboard!! There are lots of choices 
in the store so be sure to check them out!


 As you go through the hop, each of us will have a 
word for you to collect. My word is Frosted  

I have a special discount for any order from the US STORE only.  Use "GRANDOPENINGANITA" and receive 30% off your ENTIRE purchase!!!!  This includes everything in the store.  Pre-orders, scrapbooking kits, mixed media items, and already discounted items.  With the 30% discount, that makes them almost 1/2 off!  This discount is good from October 7-13 only.  

Next up on the hop is Lydia Wiley

in case you get lost on the way here is
the hop order. 


Be sure to join in the fun on our new 
Facebook group. There will be lots of 
product previews in the group and you can
ask for specific items you want to be 
stocked in the store! 

Who wants to win a prize?


In order to be eligible to win the candy, 
you must be a follower of my blog and 
leave a comment on this post. 
I will draw a winner after the blog has ended
on October 14th.


Thanks so much for stopping by today,
and have a great week!!

Sparkle - My first post as a Glitter Girl :o)

Hi everyone,  today is my first post as part of the Glitter Team for Sparkle n Sprinkle!
 I want to share a layout I made using my fabulous Embossing Powders and Glitters from SNS.
I am all about the sparkle! The more the merrier in my opinion.

I always start my layouts by choosing my photos. In this case I had a black and white photo of The Hubs and DD2 from her Debutante Ball. Of course I needed some beautiful color in the rest of my layout to make the black and white stand out.
Here is a look at my layout,,,
I love these papers and I thought they were perfect for this layout. My daughter is quite the girly girl and these papers are just like her! I used lots of fussy cutting, layers, glitter and flowers to accent.
For my background on the white doily I used several colors of Faber-Castell® Gelatos®, applied
then directly to the paper then blended with water. I also used a stencil and modeling
paste, then colored the textured part with Gelatos®
To get this look I fussy cut the flower spray from patterned paper, then used my Quickie Glue Pen and Cyclamen Glitter to add the accents and depth. On the edge of the punched border I used the same technique and Spring Willow Glitter for a little extra color.
I used the same technique here to add my glitter.
For my title I used a chippie from Fab Scraps. I covered it first with Mediterranean Embossing Powder and then I used my Quickie Glue Pen and Priceless Peacock Glitter on the stars.
To accent the corners of my photo I used more chippies from Fab Scraps and Black Embossing powder. To finish off my layout I added some bling, some pearls, some flowers and some sewing. I uses White StazOn 
for the stamping on my photo to really make it stand out.

This was the most magical time for my DD2 - she has waited years for her turn to be a Debutante-
it's a huge southern thing, we are all about big dresses and parties!
Girls actually have a "Deb Year" and ours lasted 15 months! I ended up making
4 scrapbooks to cover everything.